Smashed Winter Squash Toast with Za’atar and Feta

IMG_1627Back in October, I was lucky enough to be a guest instructor at South End Kitchen in Burlington, VT, the joint restaurant and cooking school run by my cousin chef Sarah Langan. Recreational classes have a big focus on chocolate, as South End is run in conjunction with the Lake Champlain Chocolate company. The theme of our class was all things Mediterrean and focused on authentic ingredients like za’atar, sumac, sesame and orange blossom water with local Vermont dairy, eggs and gorgeous produce. Here’s what we made:

  • Smashed Winter Squash Toast with Za’atar and Feta
  • Shakshuka (Eggs Poached in Spicy Tomato Sauce)
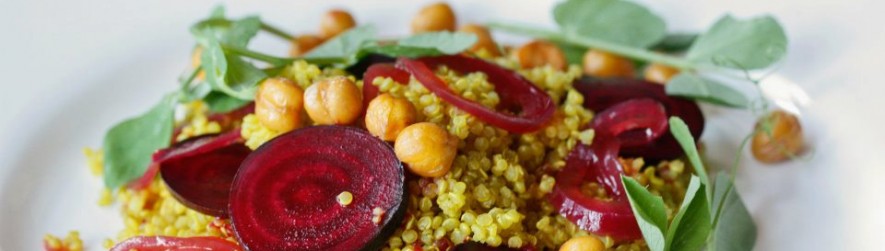
  • Roasted Root Vegetable Salad with Pomegranate
  • Orange Blossom Yogurt with Sesame and Citrus
  • Apple Bitters and Prosecco  – we had to have a cocktail, of course!

Thank you again to the entire South End team for the opportunity! I will definitely be back to Burlington soon.

Here’s the recipe for the toast – perfect for brunch or cut into pieces as an appetizer.

Smashed Winter Squash Toast with Za’atar and Feta

Serves about 8

  • 1 small winter squash, such as kabocha or delicata, cut into 1” pieces*
  • Olive oil
  • Sea salt and fresh black pepper
  • 1/2 teaspoon chile flakes, plus more for topping
  • 1 yellow onion, thinly sliced
  • 1/4 cup apple cider vinegar
  • 2 tablespoons pure maple syrup
  • 8 or more thick slices country or sourdough bread (or your favorite artisan bread)
  • 1/2 cup fresh feta cheese
  • 1 tablespoon za’atar*
  • Handful chopped fresh mint

Heat oven to 425F. Toss squash with a few tablespoons of oil, a big pinch of salt, pepper and chile flakes. Spread onto a parchment-lined rimmed baking sheet. Roast, stirring occasionally, about 30 minutes until soft and caramelized.

While squash is roasting, caramelize onions. Heat a few more tablespoons of oil in a medium saute pan on medium-low heat. Add onions and a pinch of salt, and cook, stirring frequently, until dark and jammy, about 30 minutes. Add a splash of water to the pan if onions dry out. Add vinegar and syrup and cook about 10 more minutes.

In a large bowl, combine squash and onion mixture and smash with a potato masher or the back of a wooden spoon. You want some texture here, not a completely smooth mixture. Season with more salt and pepper to taste.

Toast bread in a toaster or better yet, drizzled with a bit of oil, salt and pepper and toasted on a sheet tray @ 375F until golden brown. Spread squash mixture onto toast and sprinkle with feta, za’atar and more chile flakes. Finish with fresh mint.

*No need to peel kabocha or delicata (really). If using butternut, make sure to peel.

*Za’atar is a an ancient Mediterranean spice blend typically made with thyme or oregano, sumac, sesame seeds and sometimes cumin. Sumac is a dark red spice that has a tart lemony zing. Za’atar is delicious on grilled or roasted meats and fish, hummus and even roasted sweet potatoes. Find it online, in specialty Mediterranean shops or Whole Foods. Or, makeyour own using this recipe from 101 Cookbook 

Classes and More this Fall

203-PillPhotography-2S6A6170

Do you ever have one of those summer’s that altogether flies by? That was this summer. We’re still in the thick of it (hello, humidity), but I can’t help but think about Fall. Here’s what I’ve been cooking up…

Cooking classes at Sur La Table

Check the calendar in the next week for my updated classes for September. Some highlights are a collaboration with Matt Lewis of Baked in Brooklyn and the myth, the legend, Pat LaFrieda! If you like pastries and/or badass butchery, sign up now!

Farm Dinner at Meadowburn Farm in Vernon, NJ September 26th

I’ll be part of a team of 3 chefs cooking an Indian-themed farm dinner in nearby Warwick, NY. A short trip from NYC, the dinner will be held at Meadowburn Farm, one of the preeminent heirloom flower farms in the country. With dairy cows, sprawling gardens and our own wood-fired oven, this farm table dinner is sure to be memorable! Purchase tickets here. The farm was recently featured in the September issue or Martha Stewart Living!

Cooking Class in Burlington, VT, October 18th

I’ll be hitting the road and teaching in Vermont this October! Join me on 10/18 at South End Kitchen in Burlington. I’ll be teaching a Mediterranean Brunch class (with a farm table! And cocktails!) The menu:

  • Shakshuka
  • Smashed squash toast with za’atar and feta
  • Sweet Potato, arugula and pomegranate salad with a sumac vinagrette
  • Orange blossom yogurt with citrus and sesame
  • Prosecco Cocktail TBD

The kitchen is connected to a cafe and the Blue Bandana chocolate company. You can even ‘bootcamp’ it and take their chocolate bar making in the afternoon. My cousin Sarah runs the cafe and cooking school and is a huge proponent of the local Vermont food scene. I can’t wait! Sign up HERE!

Grilled Steak Salad with Avocado and Jalapeno-Lime Vinaigrette

steak salad The first day of summer always gives me a feeling of resolution. Like that January 1st feeling, except much warmer. This, this will be the summer I (insert best intention here…go to the beach more, take that trip, eat more ice cream for goodness sake!) As an adult, June, July and August no longer means summer vacation, unless you’re a teacher. We have to make the effort to carve out summer signifiers. On my list this year? This year, I want more ssand between my toes, spontaneous trips and actually making it to some ‘yoga in the park’ classes around the city. Of course, summer has it’s food milestones, as well. You HAVE to have at least one grilled burger, perfect corn on the cob and s’more, preferably in one meal, accompanied by lots of rosé. Living in the city, with no grill, fire pit, outdoor pizza oven or backyard to shuck corn, you get creative. All of the grilling classes I teach are done indoors on grill pans. The secret to mimicking that outdoor char-grilled flavor? A sprinkle of smoked salt. You’ll want to put it on everything. This salad starts with a perfectly seasoned and seared steak and gets better from there. The combination of pineapple, avocado and tangy, spicy dressing feels like you’re doing summer right. You could wrap everything up in grilled corn tortillas for a pretty tasty taco, as well. Just add sand, a s’more and that glass of rosé.

Grilled Steak Salad with Avocado and Jalapeno-Lime Vinaigrette Makes 2 entree-size salads Steak and Salad:

  • 8-12 ounces grass-fed flat iron steak (or your favorite cut)
  • Smoked salt, to taste
  • 1/4 fresh pineapple, cored and sliced into wedges
  • 1 bunch watercress, cleaned and tough stems removed
  • 4 cups arugula, baby or regular
  • 1 avocado, sliced
  • Pickled red onions (optional)
  • Kosher salt and fresh black pepper

Vinaigrette:

  • Juice of 2 big limes
  • 1 teaspoon whole grain mustard (I used a jalepeno mustard from Apple Ridge Farm – thanks Rebecca!)
  • 1 teaspoon honey or maple syrup
  • 1/2 jalapeno, finely minced
  • 5 tablespoons extra-virgin olive or grapeseed oil
  • Kosher salt and fresh black pepper, to taste

Heat oven to 400F. Heat a grill pan or cast-iron pan on medium-high heat. Pat dry the steak and season well on both sides with smoked salt and pepper. Sear the steak for about 3 minutes – you want some nice grill marks. Flip the steak and transfer the whole pan into the oven to continue to cook. You want an internal temp of about 135F for rare to medium-rare, check every few minutes with a thermometer. Remove the steak to a cutting board and let rest. Wipe out the pan. Heat the same grill pan used to cook the steak on medium heat. Place the pineapple on the grill and cook for a few minutes on each side until charred. Remove to the cutting board to cool. In a Mason jar, combine all the vinaigrette ingredients and shake to emulsify. Taste and add Kosher salt, pepper and more of any of the ingredients. You want a dressing with some punch – don’t be shy on the salt and lime juice. In a large bowl, toss watercress and arugula with as much vinaigrette as you like (you’ll have extra dressing). Season with Kosher salt and pepper. Divide onto bowls or plates. Slice the steak against the grain and slice the pineapple. Arrange on top of the lettuce and garnish with avocado and pickled red onion (if you want).

Mexican Green Goddess Dressing

greengoddess

With Cinco de Mayo coming up, here’s a quick little dressing to get you in the spirit. I recently stole borrowed Gwyneth Paltrow’s It’s All Good from my mom. I know Ms. Goop is a ‘love’ or ‘meh’ sort of brand, but hear me out. This cookbook is pretty darn legit. For the most part, it is indeed all good. Her co-writer, Julia Turshen, is a respectable food authority and brings realism to Paltrow’s maca root-and-green juice world. There’s an impressive amount of dressing recipes, both for salads and dipping, that make me excited for the summer produce ahead.

This Mexican Green Goddess ditty caught my eye immediately. I’ve been on a green goddess kick these days, a result of one too many vinaigrettes. Sometimes you need a creamy dressing, am I right? Traditionally made with all sorts of herbs, gobs of mayo, anchovies and lemon, this creamy dressing originated in San Francisco in the 1970s. You can almost imagine people drizzling it over iceberg and avocados. Imagine my delight when I stumbled upon this Mexican version…and had all the ingredients in-house. I blended up a jar and used it all week long to drizzle on tacos, grain bowls, and pictured here, a shredded kale/cabbage/carrot/pineapple number with spicy roasted sweet potatoes. A Gwyneth-approved taco salad of sorts. Now, I wonder what a GP-approved margarita would entail…

Mexican Green Goddess Dressing

Adapted from It’s All Good by Gwyneth Paltrow and Julia Turshen

2/3 cup plain Greek yogurt (or sub in 1/3 cup mayo + 1/3 cup yogurt)
1 handful cilantro leaves
2 scallions, roughly chopped
¼ cup lime juice (about 2 limes)
½ jalapeno, roughly chopped
3 tablespoons grapeseed oil
½ teaspoon (or more) Kosher salt or coarse sea salt
1 tablespoon honey

Combine all the ingredients in a blender. Blend until completely smooth. Add more or less lime juice and olive oil if you like it thinner or thicker. The dressing can be kept in a jar in the fridge for up to a week.

Zucchini Pasta Carbonara

Back in September, I shot some cooking videos for Sur La Table destined for Instagram and Facebook. These short snippets were created to teach and inspire…fast! It was fun to film what I do everyday – I think some of my family and friends got a better understanding of my day-to-day. Over the summer our whole staff (practically) had become enamored with spiralizing. If you don’t know, spiralizers are gadgets that turn vegetables and some fruits into swirly, curly pasta-like strands. They’ve risen to popularity thanks to blogs like Inspiralized and the recent interest in plant-based diets. They’re also really fun to eat. Over the summer I bought the Gefu hand-held spiralizer. I loved playing around with spiralizing all my CSA veggies, especially zucchini. I found myself eating way more vegetables and creating all sorts of new recipes.

One of my favorite pasta dishes is carbonara. Originating in Rome, it’s typically made by combining pancetta, eggs, TONS of Parmesan and spaghetti or linguine. It’s like adult mac-and-cheese. I kept the same flavor profile but switched out the pasta for zucchini noodles. It comes together faster than the traditional version (1 pan!) and is a bit lighter – the perfect addition to a multi-course Italian meal.

If you’re having trouble viewing the video, hop on over to the SLT Facebook page.

Zucchini Pasta Carbonara

Serves 2

  • 2 strips thick cut bacon or pancetta, cut into lardons
  • 2 medium zucchini, spiralized on the thicker spaghetti setting
  • 1 large egg, beaten
  • ½ cup grated Parmesan cheese, plus extra for serving
  • Kosher salt and fresh cracked pepper
  • Minced parsley, for garnish

In a large skillet, render bacon over medium heat. Drain out most of the fat.

Add the spiralized zucchini and sauté until tender, about 2 minutes.

In a medium bowl, whisk egg yolks, cheese, a pinch of salt and a few grinds of pepper.

Turn skillet off. Immediately add the egg mixture while stirring vigorously to gently cook the egg into a smooth sauce. If the mixture looks dry, add a bit of chicken stock or water to loosen.

Serve garnished with parsley and more grated Parmesan.

Toasted Hazelnut-Pear Muffins

IMG_0936

I’ve been posting more pastry recipes than usual here lately. No heavy hitters, like crème brûlée (you can typically find me making those at work). When I’m home, I like to bake simple. When I’m not tasked with blind-baking 8 tarts or 32 perfectly set butterscotch pots de crème, I take it easy. Granola, quick breads, healthy-ish muffins – not exactly French pastry, but in real life most people aren’t (and quite frankly, shouldn’t be) eating croissants everyday.

These hazelnut-pear muffins have been in my mental recipe file for awhile. You know when you see a recipe, and then all of a sudden, you see it everywhere? That seemed to be the case with the hazelnut/pear combination. I didn’t want a sugary cake-like muffin, rather I was going for something a bit more wholesome (does that word even exist anymore?) I eschewed my brown butter tendencies in lieu of coconut oil and a generous pour of pure maple syrup. A couple bruised red pears perked right up when folded into the dark, spiced batter. Lemon zest is the secret here. I used Meyer lemon, which has a hint of tangerine flavor, and that bit of citrus added the right amount of interest. Don’t skip the sprinkle of crunch, either. Fish around in your pantry for something, anything, crunchy. Seeds, nuts, grains, they it all add much-needed texture.

These muffins are not flaky French croissants, but they make an excellent late-night or morning snack. Perfect for fueling me through a marathon tart-making session.

Toasted Hazelnut-Pear Muffins

I love these not-too-sweet muffins with a almond-milk latte or cup of tea.

Makes 6 muffins (recipe doubles easily)

  • Nonstick baking spray
  • ¾ cup hazelnut meal*
  • ¾ cup whole-wheat pastry flour**
  • ½ teaspoon baking soda
  • ½ teaspoon baking powder
  • 2 teaspoons cinnamon
  • ¼ teaspoon nutmeg
  • Pinch ground cardamom (optional)
  • ¼ teaspoon salt
  • 1 large egg
  • 1 teaspoon lemon zest (try Meyer lemon)
  • ¼ cup pure maple syrup
  • ¼ cup coconut oil, melted if solid
  • ¼ cup + 2 tablespoons milk (any type, I used a vanilla almond milk)
  • 2 medium ripe pears, cored and diced into 1/2″ thick pieces
  • 3 tablespoons raw amaranth, millet, quinoa, ground flax, rolled oats, hazelnut meal, chia or a combination
Preheat oven to 350˚ and line muffin tin with paper liners. Spray liners with non-stick spray and set aside.
Place hazelnut meal on a parchment-lined baking sheet. Place in oven and toast for about 10 minutes, until lightly golden and fragrant. Let cool. Combine with flour, baking soda, baking powder, spices and salt.
In a separate bowl, whisk together egg, maple syrup, zest, coconut oil, and milk. Pour into dry ingredients and stir until just combined.
Fold pears into the batter. Divide muffin batter into muffin cups. Sprinkle with crunchy topping of choice. Bake for 20-25 minutes or until toothpick inserted comes out clean.

*Bob’s Red Mill makes a great hazelnut meal. If you’d rather, try making your own by grinding hazelnuts in a food processor until powdery (don’t go too far or you’ll get hazelnut butter!)

**While I haven’t tested it, I expect you could swap in a gluten-free all-purpose flour here. I like Thomas Keller’s Cup4Cup.

How to Make Insta-Worthy Avocado Toast

IMG_0621 IMG_0933

Last year at Eat Retreat, I found myself in a car, on my way to a vineyard, talking about toast. Yes, as in, toasted bread. The conversation turned to the popularity of cupcakes, doughnuts and most recently, the cronut. We all agreed there was room for a new trend in town. Thanks to bakeries like The Mill in SF and cafes such as Sqirl in LA, there is a legitimate artisan bread movement going on. And the best way to enjoy bread? Toasted, with lots of toppings. My pal Trisha has a lot to say about it here. Whether is marion berry jam (Portlandia, anyone?) or cultured butter and flaky sea salt, toast is getting a major upgrade. My favorite way to enjoy it? With avocado, of course. While there’s nothing wrong with smashing a ripe avocado on toast, there’s something so right about taking it to the next level.

And here we go.

Start by toasting your bread. What kind of bread? The ultimate (in my book) is thick-cut sourdough. Something with a crisp crust and chewy middle. Try and cut it yourself, if you can. I also love a super-thin Danish rye. I don’t have a toaster so I use my broiler and give the bread a flip halfway through. You want a golden, crisp edge. Give it time. While the bread toasts, ready your avocado. You want to make sure the avocado is green under it’s stem. Go ahead, give it a peak when you’re at the store. When ripe, the avo will be pretty soft, like a ripe peach. Cut it like this. Using a fork, scoop about half the avo onto the toast, using the fork tines to spread and smash. It’s all about the fork-smash. At this point, get creative. A sprinkle of flaky sea salt is a must. Give it some heat with fresh cracked pepper, Aleppo pepper, Szechuan pepper, whatever you like most. Hot sauce (I like chipotle Cholula) or sriracha is also delicious. Bonus points for out-of-the box toppings like black sesame seeds, wasabi powder, feta, smoked salmon, toasted sunflower seeds, chia, dried cranberries or hemp. A light sprinkle of soft herbs, baby arugula or micro greens ups the ante (and nutrition). A squeeze of lemon is never out of place. For the ultimate, put an egg on it. And don’t forget to take a picture. #avocadotoast

Game-changing combos:

  • Avo + dark rye + hot smoked salmon + dill + chives + lemon
  • Avo + sourdough + heirloom tomato (when in season, of course) + bacon + scallion
  • Avo + toasted pita + dukkah + feta
  • Avo + tamari rice cake + thin sliced cucumber + sriracha + Togarashi seasoning

Roasted Radicchio with White Beans, Figs and Walnuts

IMG_0921

I was scrolling through Facebook last night (the eye of winter storm Juno) and a friend’s post caught my eye. The NY Times headline: No Food Takeout During Storm. The Mayor placed a ban on non-emergency travel, cutting off food delivery vehicles. According to Mayor De Blasio, a “food delivery bicycle is not an emergency vehicle”. My comment? New Yorkers are going to be forced to cook (muhaha!) All jokes aside, when you dive in a little deeper, this pseudo-crisis, is well, a crisis.

A friend visiting from out of town commented how little I had in my fridge. But when the time came to make dinner, I dug into my pantry and found a few vegetable odds and ends rolling around in my crisper. Spices, good olive oil and salt, salt, salt, and dinner was done. In 30 minutes, nonetheless. I often cook by way of my fridge”mise en place”, or everything in it’s place. A weekly batch of farro, a tray of roasted vegetables, cooked beans I froze months ago – they all add up to whole meals. I keep rich extras like Greek feta, real, crumbly Parm and toasty walnuts at the ready. This is the way I’ve been cooking for years and most likely the way I’ll always do it. Augmented with something fresh – a gorgeous piece of fish from Whole Foods, a bit of cooked sausage from the butcher, a ripe-right-now avocado, it all gets used.

This warm salad is an homage to my pantry. Thirty minutes of prep work on a Sunday meant this dish came together in 10. This is more of a formula than a recipe. Combine a roasted vegetable with a cooked bean, add some caramelized onions, something crunchy and something sweet. Lemon and salt, always. Maybe there will be a new headline “Storm Brings People Back into the Kitchen”. I like the sound of that much better.

Roasted Radicchio with White Beans, Figs and Walnuts

Loosely adapted from Bon Appetit

Serves 4

  • 1/2 pound white beans (such as cannellini or flageolet), soaked overnight in water
  • 1 bay leaf
  • 2 cloves garlic
  • 2 tablespoon olive oil, plus more for finishing
  • 2 heads radicchio, sliced into 2″-thick wedges
  • 1/3 cup caramelized onions (here’ how)
  • 1 teaspoon whole grain mustard
  • 1/3 cup toasted walnuts, chopped
  • 1/3 cup dried figs, sliced
  • 1/2 cup parsley, chopped
  • Zest of 1 lemon
  • Drizzle balsamic vinegar
  • Kosher salt and fresh black pepper

Drain soaked beans and place in a large pot. Cover with fresh water, add bay leaf and garlic cloves. Bring to a boil over high heat, reduce heat to simmer. Cook on low, covered, for about 30 minutes until beans are tender. Remove bay leaf and garlic (you may smash the garlic with the back of a knife and stir into the beans). Season the pot with Kosher salt to taste. Keep warm. Beans can be cooked a few days ahead of time and stored in their cooking liquid.

Heat oven to 450. Line a rimmed baking sheet with parchment paper. Drizzle olive oil over radichio gently toss to combine. Season with a big pinch of salt and pepper and spread out on baking sheet. Roast for about 20 minutes until tender and charred in some places. Set aside.

Drain beans, reserving cooking liquid. In a large skillet, combine beans, roasted radicchio, mustard and caramelized onions. Heat, stirring occasionally and adding spoonfuls of bean cooking liquid to bring everything together. Season with salt and pepper. Transfer to a serving platter or bowl and garnish with walnuts, dried figs, lemon zest and a drizzle of balsamic vinegar and olive oil. Enjoy warm.

Citrus Olive Oil Cake

IMG_0919

Every once in awhile a recipe comes along that instantly goes into your “keeper” file (or Pinterest board). My infatuation with olive oil cakes stems from a version I had a few years ago at Market Table in the West Village. I shared a piece with my dear friend/culinary soul mate Kathleen and we were both floored. It had a rosemary-infused whipped cream and in my memory, it was perfect.

The cake became a staple during my catering days. I could make it in advance, the only type of desserts I really do. The garnishes were endless – blood orange compote, thyme whipped cream, cacao nibs, pine nut brittle. I often used Greek yogurt in the batter to add a bit of tang, but I found it weighed down the cake a bit. This version, my favorite so far, has buttermilk, ground almonds, lots of citrus zest, vanilla bean paste and orange oil. If you’ve only used vanilla extract, get your hands on the paste. It has flecks of pure vanilla bean and is just…yum. Pure orange oil is also worth seeking out. It gives a real hit of orange flavor (a little goes a long way).

With citrus season in full swing, this is a cake to make now. It’s a keeper.

Citrus Olive Oil Cake

Recipe adapted from Giada de Laurentiis

Cake:

  • 1 1/2 cups all-purpose flour
  • 2 teaspoons baking powder
  • 2/3 cup ground almonds or almond meal
  • 1/2 teaspoon Kosher salt
  • 1 cup granulated sugar
  • 3 large eggs
  • 2 teaspoons pure vanilla extract or vanilla bean paste
  • 1/2 teaspoon orange oil 
  • Zest and juice of 1 large orange
  • Zest of 1 lemon
  • 1/4 cup buttermilk
  • 3/4 cup extra-virgin olive oil

Glaze:

  • 1/2 cup confectioners sugar
  • 1/2 teaspoon orange oil (optional)
  • Pinch orange zest
  • 1 teaspoon vanilla extract or vanilla bean paste
  • Pinch salt
  • Hot water, to thin

Directions:

Heat oven to 350F. Rub an 8 or 9″ cake pan with butter or spray with nonstick spray. Line the bottom of the pan with parchment paper. Grease the paper.

Whisk flour, baking powder, almond meal and salt in a bowl. In a stand mixer, beat sugar and eggs until pale and fluffy, about 3 minutes. Beat in vanilla and orange oil, citrus zest and orange juice. Gradually beat in buttermilk and oil.

Add dry ingredients in 3 additions, beating a about 30 seconds between additions. Scrape the sides and bottom of the mixer periodically. Do not over beat (this will make the cake tough).

Transfer cake batter into prepped pan. Bake for about 35 minutes until a toothpick comes out with just a few crumbs. Cool in pan about 15 minutes. Run an offset spatula or thin, sharp knife around the edge of cake and turn onto a serving plate. Using a toothpick, poke a few holes in the cake.

To make the glaze: whisk together the sugar, orange oil, vanilla, salt. Add hot water, a teaspoon at a time to thin the glaze to a pourable consistency. Pour over warm cake.

Winter Squash, Date and Lemon Compote

IMG_0913

The revamped NY Times Cooking site recently had a piece called “Cook Like a Californian, Wherever You Live”. In the depths of this New York winter, I am up for the challenge. My warm-weather CSA haul is a distant memory. My trips to the farmer’s market are fewer these days. And the sun? It shows up when it wants. What’s a seasonal cook to do?

Each January, Bon Appetit releases an online Food Lover’s Cleanse. While I’ve never followed the plan, there are always a few recipes that catch my eye. This squash, date and lemon compote sounded like the perfect Cali-meets-NY mash up. Sweet Medjool dates, earthy squash and bright, tangy sweet Meyer lemon were far more than the sum of their parts. BA suggests stirring a dollop into your hot morning oatmeal (or barley bowl, if you’re following their plan). I’ve been pairing it with plain Greek yogurt and spread on dark rye with thick labneh and a sprinkle of sunflower seeds. It almost (almost) makes me forget I’m not in cooking in California.

Winter Squash, Date and Lemon Compote

from Bon Appetit

Ingredients:

  • ½ winter squash, such as butternut or Kabocha, peeled, cut into ½” pieces (about 4 cups)
  • 1 cup golden raisins
  • 8 large Medjool dates, pitted, chopped
  • Juice from 2 lemons (try Meyer lemons for a twist)
  • 1 cinnamon stick
  • 6 whole cloves
  • 1 teaspoon kosher salt
  • 1 teaspoon finely grated lemon zest (Meyer or regular)

Directions:

In a large Dutch oven or saucepan, combine squash, raisins, dates, lemon juice, cinnamon stick, cloves, salt, and 1 cup water. Bring to a boil over medium heat. Reduce heat to a simmer and cook, covered, 8–10 minutes. Add more water if mixture starts to stick. Uncover about 10 minutes more until squash is tender and liquid is absorbed. Remove cinnamon stick and cloves. Stir in lemon zest. May be enjoyed warm or cold.